Pages

Saturday, June 2, 2012

Schedule Windows to Automatically Restart

How to schedule a Windows 98/2000/XP/2003 Computer to reboot.
This tutorial will show you how to schedule your PC to reboot at a given time and date, using the utility provided. This tutorial will work with Windows Server 2003, Windows XP, Windows 2000, and Windows 98. For this tutorial I will be using windows XP.
First Schedule Windows to Automatically Restart Download. Save it to disk and extract shutdown.exe to your C:\ drive.
Now open the Control Panel by clicking Start > Control Panel
In the Control Panel double click the Schedules Tasks (May be labeled Task Scheduler in other versions of windows) icon .

 
The Scheduled Tasks window should open up. Select Add Scheduled Task
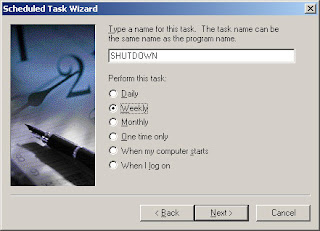
This scheduled task wizard should open. Click next on the first screen.
Click browse and locate the shutdown.exe program. Select shutdown.exe and click open.
Select how often you would like to perform the task. I want my computer restart Weekly on Sunday morning, so I selected weekly. Make your select and click the next button.
Now select the time and the days of the week and click next. I selected 2am on every Monday.
On the next screen you will have to enter your password for windows. You must have a login password for these batch jobs to run. If you do not have a password you will need to add one in user settings. Enter your password information and click next.
On the final screen, put a checkmark the box that says “Open advanced properties for this task when I click Finish” and then click finish
Now we will see the advanced properties window.
Now we have to add a few arguments to the command in the run line. Add the –r –f –t 01 arguments to the line that exists in the run field. My line reads: “C:\SHUTDOWN.EXE –r –f –t 01”.
Then click apply and the task will be scheduled. You can check later in the task scheduler to see if the task ran successfully.

Automatically log off when I login in my Windows Server 2003

Wow I had this happen to me and it sucked big time. What I did to fix it was boot to the recovery console (safe mode works better if you can get to it) by finding your install cd and running a recovery console and then using system restore (kind of) from with in there. If you already tried running checkdisk and fix boot skip down to the second 12 steps below the dashed line.

1. Insert the Windows 2003 cd into the top cd drive
2. Turn the computer off
3. Setup the computer to boot from cd: either by pressing F2, F9 or Delete to go in BIOS or by pressing F12 on Dell computers to launch the Boot Device Menu
4. As soon as you get the message Press any key to boot from the cd hit enter.
5. Wait ~3 minutes for the Windows Setup to initialize
6. At the Welcome to Setup screen press R to repair windows using recovery console.
7. Wait a couple of minutes while setup examines the hard drive.
8. You will be prompted to choose a Windows installation. Press 1 on the top of the keyboard and then
9. You will be prompted to enter the Administrator password. Press Enter if no password was set.
10. Perform a disk check:

chkdsk /p
fixboot

11. Type exit to restart the computer.
12. As soon as the computer starts hit F8 every second to bring up the Advanced Options Menu.
13. Choose the Last Known Good Configuration.
14. If these steps didn't resolve the issue go back in Recovery Console and this time run the system restore.
_______________________________________________--

1. launch the recovery console just like before.

2. When you’re at the Recovery Console command prompt, change into the root directory of the system drive with the cd command (i.e., cd \).

3. Change into the System Volume Information directory by typing cd system~1 on most machines, or cd “System Volume Information.”

(The filenames with ~1 are generated by default to provide backwards compatibility with programs that only recognize 8.3-format filenames. It’s possible to disable 8.3 filename generation on NTFS volumes to gain some speed, but the speed gained by doing this is generally pretty small and it can have the unintended consequence of making it impossible to use 8.3 filenames in contexts like this. If you can’t use 8.3 filenames to navigate, 8.3 name generation might be disabled. See Microsoft’s support document called How to Disable the 8.3 Name Creation on NTFS Partitions.

4. The System Volume Information directory contains a folder name _restore followed by a GUID in curly braces. Change into it by typing cd _resto~1; if that doesn’t work you’ll have to type cd “_restore{GUID_STRING}”, with the full GUID string in place of GUID_STRING.

5. In the _restore directory are a group of subdirectories starting with the letters RP and followed by a number. These are the different restore points available for that volume.

6. Check the date on each directory and look for one that corresponds to a date before you began experiencing problems.

7. Change into the appropriate directory. If the directory is named RP74, for instance, change into it by typing RP74.

8. Inside that directory will be a subdirectory named snapshot; change into that directory as well (cd snapshot)

9. The snapshot directory holds backup copies of the SOFTWARE and SYSTEM Registry hives, named _REGISTRY_MACHINE_SOFTWARE and _REGISTRY_MACHINE_SYSTEM, respectively.

10. The target directory for these files is \Windows\System32\Config, and the hives there are named SOFTWARE and SYSTEM. Rather than overwrite those files entirely, you can rename them to something else. Typing ren \windows\system32\config\software \windows\system32\config\software.bak and ren \windows\system32\config\system \windows\system32\config\system.bak will rename them to software.bak and system.bak, respectively.

11. Copy in the backup hives: copy _REGISTRY_MACHINE_SOFTWARE \windows\system32\config\software and copy _REGISTRY_MACHINE_SYSTEM \windows\system32\config\system.

12. Type exit to leave the Recovery Console and restart the computer.

Windows Active Desktop Recovery problem

Dear all,

“”Windows XP Active desktop error””


To resolve this problem, follow these steps:


1. Go to Run Command,

3.Type Notepad ->Enter

4.Copy

HKEY_CURRENT_USER = &H80000001
strComputer = "."
Set objReg = GetObject("winmgmts:\\" & strComputer & "\root\default:StdRegProv")
strKeyPath = "Software\Microsoft\Internet Explorer\Desktop\SafeMode\Components"
strValue = "0"
ValueName = "DeskHtmlVersion"
objReg.SetDWORDValue HKEY_CURRENT_USER, strKeyPath, ValueName, strValue3.


5.paste to notepad and save as to active.vbs extesion.

6.Go to Safemode,

7.Run active.vbs file

8.Restarted the Computer, and then log on. The Restore My Active Desktop button has been removed

Outlook 2010 PDF Preview Issue


·         Firstly, please kindly check if the PDF Preview Handler function has been disabled.
1. Launch Outlook.exe, go to File > Option > Trust Center > Trust Center settings > Attachment Handling
1. Uncheck the box "Turn off Attachment Preview"
2. Click option "attachment and Document Previewers" and check the box "PDF Preview Handler"
Thanks.
Prashob

Friday, June 1, 2012

Removal procedure for csrcs.exe


Manual proceudre
Steps to remove this virus:
1.    Scan the system with a good and updated Anti Virus.
2.    Open Task Manager, locate this exe (csrcs.exe or csrsc.exe but not csrss.exe), and kill the process.
3.    Now type msconfig in the Run box, and then go to startup tab.
4.    Locate this exe file, if any, and then remove it from there as well.
5.    Now search the file in the C: drive.
6.    Permanently delete the file (csrcs.exe or csrsc.exe only) from the computer.
7.    Reboot the PC for changes to take place.
After doing the above steps, you need to clean the registry as well.
  1. Navigate to HKEY_LOCAL_MACHINE\SOFTWARE\Microsoft\WindowsNT\CurrentVersion\Winlogon\
  2. On the right side, there is a key named “Shell”, it may be having a value “explorer.exe csrcs.exe”. Just modify it to delete the csrcs.exe from it (not explorer.exe). Restart the computer
With the help of ePO console
  1. Log on to ePO console
  2. System --> My Organisation --> Policies -->
  3. Edit the Unwanted Program policy from VirusScan Enteprise v8.5i & 8.7i
  4. User Defined detection tab
  5. Click on New process
  6. Specify file name as csrcs.exe
  7. Description will be "virus infected file" or "new virus"
With Regards,

Prashob

Howto export list of users from an Active Directory group

Hi ,

Howto export list of users from an Active Directory group


dsquery group -name MYGROUP | DSGET group -members

Then you can put it to a text file by simply adding “> mygroup-members.txt” and the end for example. More simple than struggling around with VBScripts, and very useful.

Reg VB error & File locked by another user -Win 7 Migrated users

Hi ,


If any user complains of excel error Microsoft Visual Basic Error - “ System Error & H8004005(-2147467259) Unspecified error”or user receives error always like FILE LOCKED FOR EDITING BY ANOTHER USER even though no user has opened file in filer, Please follow below steps to resolve issue.

1.Close all excel sheets
2. Open a new excel file ,go to file ,–excel options,-Add ins


3. Click on go
4. If Conditional Sum Pack is checked ,please uncheck ,click ok & close excel .

Thanks,
Prashob

How To Make Bootable USB

Creating or using an USB drive to install Windows operating systems is very easy if you follow the below mentioned steps.
bootable usb drive
If you are planning to use bootable USB to install Windows 7 or Vista please refer our guides:
Install Windows 7/Vista using bootable USB guide
Coming back to bootable USB guide, here we assume that you are using either Vista or Windows 7 to create a bootable USB.
1. Insert your USB (4GB+ preferable) stick to the system and backup all the data from the USB as we are going to format the USB to make it as bootable.
2. Open elevated Command Prompt. To do this, type in CMD in Start menu search field and hit Ctrl + Shift + Enter. Alternatively, navigate to Start > All programs >Accessories > right click on Command Prompt and select run as administrator.
3. When the Command Prompt opens, enter the following command:
DISKPART and hit enter.
LIST DISK and hit enter.
Once you enter the LIST DISK command, it will show the disk number of your USB drive. In the below image my USB drive disk no is Disk 1.
4. In this step you need to enter all the below commands one by one and hit enter. As these commands are self explanatory, you can easily guess what these commands do.
SELECT DISK 1 (Replace DISK 1 with your disk number)
CLEAN
CREATE PARTITION PRIMARY
SELECT PARTITION 1
ACTIVE
FORMAT FS=NTFS
(Format process may take few seconds)
ASSIGN
EXIT
Bootable USB
Don’t close the command prompt as we need to execute one more command at the next step. Just minimize it.
5. Insert your Windows DVD in the optical drive and note down the drive letter of the optical drive and USB media. Here I use “D” as my optical (DVD) drive letter and “H” as my USB drive letter.
6. Go back to command prompt and execute the following commands:
D:CD BOOT and hit enter. Where “D” is your DVD drive letter.
CD BOOT and hit enter to see the below message.
BOOTSECT.EXE/NT60 H:
(Where “H” is your USB drive letter)
USB Bootable
7. Copy Windows DVD contents to USB.
You are done with your bootable USB. You can now use this bootable USB as bootable DVD on any computer that comes with USB boot feature (most of the current motherboards support this feature).
Note that this bootable USB guide will not work if you are trying to make a bootable USB on XP computer.

Thank You..

Unable to compose a mail using Microsoft Webmail

Please could you follow the following steps
1. Log in to webmail.
2. In left hand pane, click Options.
3. On right hand pane, scroll down a little bit till you see Security. Under which you can see a download button under S/MIME.
4. Download and install the latest S/MIME.
5. Now close Internet Explorer and open IE again.
6. Log into webmail and try to compose a new mail.

Solution to Account Locking out when accessing Virtual name of a cluster


Applies to Windows 7 and Server 2008 only.


To get Windows 7/Server 2008 to work follow the simple instructions below:

1. Open the Run command and type "secpol.msc".


2. Press "continue" when prompted by Windows 7/Server 2008.

3. Click on "Local Policies" --> "Security Options"


4. Navigate to the policy "Network Security: LAN Manager authentication level" and open it.

5. By default Windows 7/Server 2008 sets the policy to "NTVLM2 responses only". Change this to "LM and NTLM – use NTLMV2 session security if negotiated".
 
By Prashob