- This post is intended to guide you with the required installation steps for SCCM 2012. We are assuming a simple install with a unique Primary Site Server and a remote SQL Database Server with a named instance.
For this tutorial we will take 6 main Steps:
Step1 - The LAB enviroment
Step2 - Extend Active Directory Schema
Step3 - System Container creation and Permissions Assignment
Step4 - Site Server Prerequisites
Step5 - SQL Server considerations
Step6 - SCCM 2012 intallationStep1 - The LAB enviromentFor this LAB, we setup an Active Directory infra-structure with the following characteristics:
TSTDC1.lab.local -> A domain controller for the domain lab.local
TSTSCCM.lab.local -> The site server machine witch will host the Site Server role and most of the system roles
TSTSQL.lab.local -> The SQL Server machine, witch will host the Database System role and the Reporting Services Point role. The SQL Server version installed is SQL Server 2008 SP2 with CUP7. A named instance called SMSIST1 is setup and ready to use
CLT01.lab.local -> A Windows 7 client machine that represents the common users computers in a domain
All Server systems are running Windows Server 2008 R2 SP1.
All computer are join to the domain lab.local
We also create some domain accounts for various purposes:
SQL_SA -> a domain user account used for SQL server services
SCCM_SA -> a domain user account for use in various SCCM services, like, push install, Network Access Account, etc
SCCMadmin -> a domain user account with admin rights in the SCCM infra-structure
Reports_SA -> a domain user account for use with reporting services
NOTE: We may not be using all mention accounts in this guide, this is just a simple and basic creation of Active Directory accounts for a SCCM enviromentStep2 - Extend Active Directory SchemaExtending Active Directory Schema for SCCM 2012 is a simple process that consists in running an exe file in one of you Domain Controllers. As there aren't any changes in the Schema extensions since SCCM 2007, if you have previously upgrade your AD Schema with this extensions you do not need to Upgrade it again.To extend the AD Schema follow this steps:1. Logon to a Domain Controller with an account that have Domain and Schema Admin privileges2. Access the SCCM 2012 media content, by network browse or directly from the DVD.3. Navigate to \SMSSetup\Bin\x64\ and execute Extadsch.exe 4. Verify the log file generated in c:\ ExtADSch.log to confirm that the upgrade was successful
 5. If applicable, wait for the Active Directory Replication to take place or force it with repadmin tool or Active Directory Sites and Services snap-inStep3 - System Container creation and Permissions AssignmentNow we need to create a new container under Active Directory System Container, and then we need to assign Full Control permissions in this container for each Site Server computer account. In our case we are only installing a Primary Site Server, so we just need to assign permission to one computer object (TSTSCCM).1. From a Domain Controller with a Domain Administrator account open ADSI Edit snap-in (adsiedit.msc)2. Select the top node of the left pane, right click and choose connect to, accept the default naming context and click OK.3. In the container CN=System, right click and select new -> object
 4. Choose Container in the Class type menu and hit next
 5. In the value field for the container object write System Management and press next
 Now that the System Management Container it´s created we need to give Full Control permission on this container and in all his descendant objects to every Site Server computer account. To do this follow this steps:1. Again from ADSI Edit select the System Management Container, go to it´s properties2. In the security tab add the Site Server computer account to the ACL and assign full control permissions to it
 3. Click on advanced tab, select the Site Server computer account and click edit
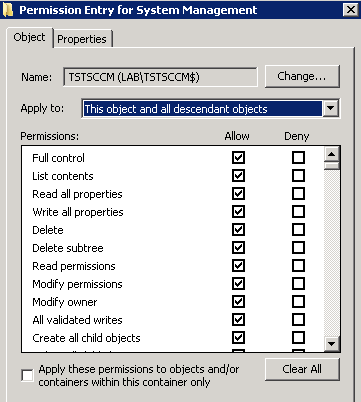
 4. In the permission entry for System Management windows, from the Apply to drop dwon box menu choose This object and all descendant objects, click OK all the way down until all windows are closed.
 5. Again, wait or force replication between Domain Controllers if applicableStep4 - Site Server PrerequisitesSo, our Active Directory preparations tasks are done, now we focus on the Site Server preparation. As mentioned we are going to install a stand alone Primary Site Server. For that, we need to install a bunch of feature and application in the Site Server computer (TSTSCCM).You can review the prerequisites for the various roles here, to simplify the process we will just run a power shell command to install all the features we need in one shoot.1. On your Site Sever computer, open a power shell command prompt and type:Import-module servermanager <enter>
Add-WindowsFeature Web-Common-Http,Web-Static-Content,Web-Default-Doc,Web-Dir-Browsing,Web-Http-Errors,Web-Http-Redirect,Web-Asp-Net,Web-Net-Ext,Web-ASP,Web-ISAPI-Ext,Web-ISAPI-Filter,Web-Http-Logging,Web-Log-Libraries,Web-Request-Monitor,Web-Http-Tracing,Web-Basic-Auth,Web-Windows-Auth,Web-Url-Auth,Web-Filtering,Web-IP-Security,Web-Stat-Compression,Web-Mgmt-Tools,Web-WMI,NET-Framework,RDC,BITS -Restart <enter> 2. Download and install .NET Framework 4 - here
3.There are some optional windows features / roles that you could install, depending on what kind of functionality you want to use from SCCM, for example, if you plan on using Software Updates you will need the WSUS role installed on the site system you install the SCCM SUP (Software Update Point) role, likewise if you plan on using OSD (Operating System deployment), you will need the WDS (Windows Deployment Services) installed. In our case we will just add this roles in a later time, note that for WDS, you don´t need to install the role manually like WSUS, in SCCM 2012, the role is installed automatically once you enable the PXE role.4. Add the Site Server computer account (TSTSCCM) and the SCCMadmin user to the local administrators group of your Primary Site Sever computer (TSTSCCM). 5. You should run windows update and patch your server to the highest level
This should install all the main prerequisites you need for your Primary Site Server installationStep5 - SQL Server considerationsHas told, we are using a separate server for hosting the SQL server Database and the Site System Database role. We also decide to use a named instance for SMS Database, witch intern needs some additional configurations compared with using just the default instance.We are not going to do a step by step on how to install SQL, we are just going to mention some relevant aspects that you need to take in consideration when building you SQL Sever.1. You could see the supported versions of SQL Server here2. You only need to install the Database Engine feature for each site server, of course Management Tools could come in handy, Reporting Services is optional, but you probably would install it, since reporting in SCCM 2012 is only through Reporting Services, no more Reporting point role :) 3. You must use a dedicated instance of SQL Server for each site, in other words, you cannot host two Database from two different Site Servers in the same SQL instance, it could be in the same server though, but in separated instances4. Limit SQLServer memory to 80 - 90% of the addressable memory if the SQL is in a dedicated Server. if the SQL is co-located with the Site Server computer limit the memory to 50 - 80%. You can do this with SQL Server Management Studio, by selecting the top SQL Server instance node, going to it´s properties, and in the memory page define a limit for the maximum server memory
 5. If you configure you SQL Server service to run with a domain user account (best practice) you might have to register a SPN (Service Principal Name) in Active Directory for that domain account. You will need to register two SPN for the account, one for the NETBIOS name of the SQL Server and other for the FQDN. to do that, on a domain controller, open a command prompt and type:setspn –A MSSQLSvc/<SQL Server NETBIOS name>:1433 <Domain\Account>setspn –A MSSQLSvc/<SQL Server FQDN>:1433 <Domain\Account>in our example we have:setspn –A MSSQLSvc/TSTSQL:1433 LAB\SQL_SAsetspn –A MSSQLSvc/TSTSQL.lab.local:1433 LAB\SQL_SAAfter registering the SPN´s you could check them by typing:setspn –L <domain\SQL Service Account>once again in our example:setspn –L LAB\SQL_SA6. Open Firewall ports on you SQL server, you could just turn off Windows Firewall, however if you like to take advantage of windows firewall security just ensure you open the necessary ports, the script below will do that for you, just copy and paste it in a notepad, save it as a *.bat file, and run it from a command prompt@echo ========= SQL Server Ports ===================
@echo Enabling SQLServer default instance port 1433
netsh firewall set portopening TCP 1433 "SQLServer"
@echo Enabling Dedicated Admin Connection port 1434
netsh firewall set portopening TCP 1434 "SQL Admin Connection"
@echo Enabling conventional SQL Server Service Broker port 4022
netsh firewall set portopening TCP 4022 "SQL Service Broker"
@echo Enabling Transact-SQL Debugger/RPC port 135
netsh firewall set portopening TCP 135 "SQL Debugger/RPC"
@echo ========= Analysis Services Ports ==============
@echo Enabling SSAS Default Instance port 2383
netsh firewall set portopening TCP 2383 "Analysis Services"
@echo Enabling SQL Server Browser Service port 2382
netsh firewall set portopening TCP 2382 "SQL Browser"
@echo ========= Misc Applications ==============
@echo Enabling HTTP port 80
netsh firewall set portopening TCP 80 "HTTP"
@echo Enabling SSL port 443
netsh firewall set portopening TCP 443 "SSL"
@echo Enabling port for SQL Server Browser Service's 'Browse' Button
netsh firewall set portopening UDP 1434 "SQL Browser"
@echo Allowing multicast broadcast response on UDP (Browser Service Enumerations OK)
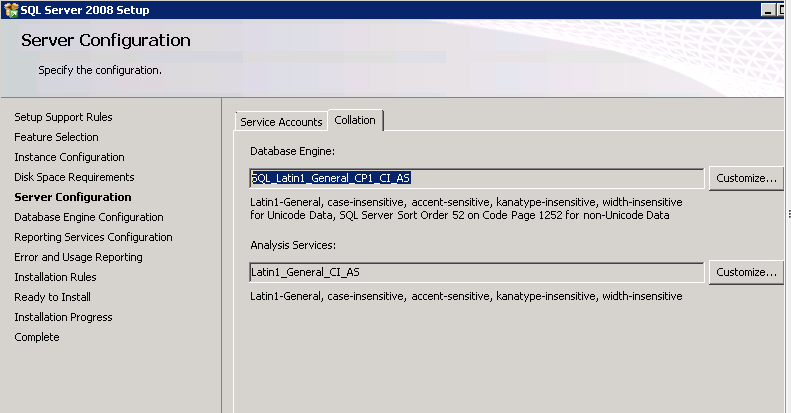
netsh firewall set multicastbroadcastresponse ENABLE7. During SQL installation in the collation tab, you should set the Database Engine to use SQL_Latin1_General_CP1_CI_AS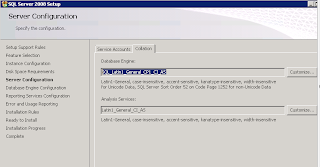 8. During SQL server installation in the account provisioning tab, you should set the authentication mode to Windows Authentication and in the SQL Server Administrators add the SCCMadmin user and the current user from witch you are installing SQL.
 9. As we told, when using a named instance you do need to make same additional configurations. SCCM Site Server do not support Dynamic Ports, and SQL Server named instances use dynamic ports by default, so we need to fix that.a. Logon to your SQL Server and open SQL Server Configuration Manager
b. Expand SQL Server Network Configuration, select Protocols for "you instance name". From the central pane, double click on TCP/IP protocol
c. In TCP/IP Properties windows select the IP Addresses tab
d. Now for every IP configuration, from IP1 through IPAll, delete the "0" in the TCP Dynamic Ports field, leaving it just empty and fill in the TCP Port of every IP with the value of 1433. Click OK to close the window
e. To apply the changes, go to SQL Server Services node, select your SQL Server instance and do a restart to the service
10. Add the Site Server computer account (TSTSCCM) and the SCCMadmin user to the local administrators group of the SQL Server (TSTSQL)11. Make sure you have all necessary SQL patches, the minimum Service Packs and CU (Cumulative Updates)Step6 - SCCM 2012 intallationActive Directory is prepared our Site Server prerequisites installed and our SQL Server up and running, we are finally ready to kick the SCCM installation.From your Site Server computer, with your SCCMadmin account follow this steps:1. Navigate to your installation media and execute splash.hta2. In the configuration Manager Setup windows click install 3. In the Getting Started window, select Install a Configuration Manager Primary Site and click next
 4. In the prerequisites licenses page accept all three license terms and click next
5. In the prerequisites download page, specify a local folder to download all the necessary additional files for the installation and click next. Wait for the download to complete
6. In the server language selection window, select the languages you want to install for your console and reports, click next
7. In the client languages selection window, select the languages you want to be available for you clients, click next
8. In the site and installation setting page, specify the 3 digit Site Code for your Site Sever, we are using LB1 in our LAB. Fill in a site name for your Primary Site Server, specify the installation path and choose whether or not to install the SCCM console on the Site Server, witch you probably would want to. click next
9. In the primary site server installation window, just select whether you are going to join the Site Server to an existing hierarchy in witch case you must specify the CAS Server FQDN, or whether to perform a Stand Alone install, note that if you choose a Stand Alone install, you can not join the Primary Site Server later to a hierarchy. In our scenario we are going to install a stand alone Primary Site. click next
10. In the Database information page enter your Database location information, SQL Server Database FQDN name, instance name (leave blank if you are using the default instance) we are using a named instance called SMSIST1. You should accept defaults for the Database name and for the SSB port, click next
11. In the SMS Provider Setting specify the SMS Provider FQDN, this probably would be you Site Server, click next
12. In the client computer communication settings, choose configure the communication method in each site system role, click next
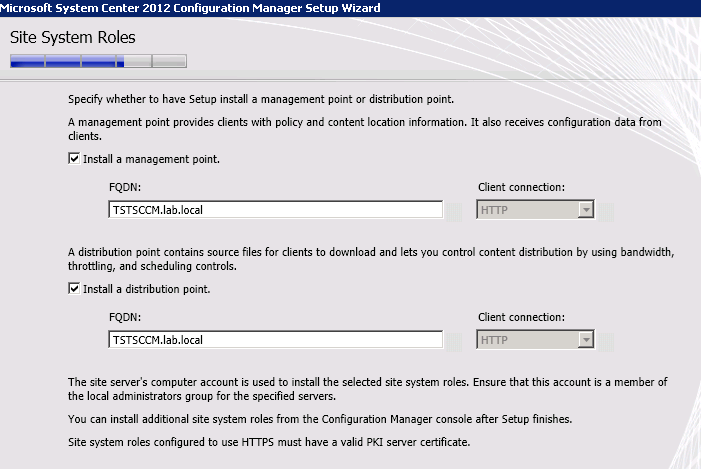
13. In the site system role, check the Install a management point and install a distribution point, click next
14. Then a prerequisite checker will run to verify that all the requisites for the installation are OK. If you get some warnings it´s fine, you can proceed with the installation anyway. You will probably get a warning about SQL Server process allocation and about WSUS SDK, if like me, you decide to install it later. Hit begin install, lay back and wait about 15 to 20 minutes

15. Once the installation is done, click close, reboot the Server, open the SCCM Console and enjoy, Congratulation, you have just installed you first SCCM 2012 Primary Site Server
TIP: you can view all the installation processes in real time, in your site server computer just go to \SMSSETUP\TOOLS\ on your installation media and run CMTrace tool, then open the log file in c:\ConfigMgrSetup.log, this will show you what is happening in the background during installation and let you identify potential problems in an easy way.
Wednesday, March 13, 2013
SCCM 2012 installation guide


Tuesday, March 5, 2013
Windows 8 Start menu
Windows 8 Start Button
How to add a Start button to Windows 8?
Just install Start Button 8!
The package contains a Start button and a convenient Menu. A ready solution for those who like to keep everything under control.
Attention! Start Button 8 works perfectly with older versions of Windows.
Just install Start Button 8!
The package contains a Start button and a convenient Menu. A ready solution for those who like to keep everything under control.
Attention! Start Button 8 works perfectly with older versions of Windows.
Monday, July 23, 2012
Windows 7 shortcut keys
Calculator Keyboard Shortcuts
Command Prompt Keyboard Shortcuts
Dialog Box Keyboard Shortcuts
Ease of Access Keyboard Shortcuts
Function Key Keyboard Shortcuts
NOTE: On multimedia keyboards, you may need to press the F-Lock or Function key first.
General Keyboard Shortcuts
Help and Support Keyboard Shortcuts
Magnifier Keyboard Shortcuts
Paint Keyboard Shortcuts
Remote Desktop Keyboard Shortcuts
Taskbar Keyboard Shortcuts
Windows Explorer Keyboard Shortcuts
Windows Journal Keyboard Shortcuts
Windows Logo Keyboard Shortcuts
Windows Media Center Basic Navigation Keyboard Shortcuts
Windows Media Center Audio Keyboard Shortcuts
Windows Media Center View Pictures Keyboard Shortcuts
Windows Media Center Watch & Record TV Keyboard Shortcuts
Windows Media Center Play DVDs Keyboard Shortcuts
Windows Media Center Play Videos Keyboard Shortcuts
Windows Media Player Keyboard Shortcuts
WordPad Keyboard Shortcuts
- Alt+1 Switch to Standard mode
- Alt+2 Switch to Scientific mode
- Alt+3 Switch to Programmer mode
- Alt+4 Switch to Statistics mode
- Alt + C Calculate or solve date calculations and worksheets
- Ctrl + E Open date calculations
- Ctrl + H Turn calculation history on or off
- Ctrl + L Press the MC button
- Ctrl + M Press the MS button
- Ctrl + P Press the M+ button
- Ctrl + Q Press the M- button
- Ctrl + R Press the MR button
- Ctrl + U Open unit conversion
- Del Press the CE button
- Esc Press the C button
- F1 Open Calculator Help
- F9 Press the +/– button
- R Press the 1/× button
- @ Press the square root button
- Ctrl+ Shift + D Clear the calculation history
- Enter Recalculate the calculation history after editing
- Esc Cancel editing the calculation history
- F2 Edit the calculation history
- Down Arrow Navigate down in the calculation history
- Up Arrow Navigate up in the calculation history
- D Press the Mod button in Scientific mode
- I Press the Inv button in Scientific mode
- L Press the log button in Scientific mode
- M Press the dms button in Scientific mode
- N Press the ln button in Scientific mode
- O Press the cos button in Scientific mode
- P Press the pi button in Scientific mode
- Q Press the x^2 button in Scientific mode
- S Press the sin button in Scientific mode
- T Press the tan button in Scientific mode
- V Press the F-E button in Scientific mode
- X Press the Exp button in Scientific mode
- Y Press the x^y button in Scientific mode
- Ctrl + B Press the 3√x button in Scientific mode
- Ctrl + G Press the 10x button in Scientific mode
- Ctrl + O Press the cosh button in Scientific mode
- Ctrl + S Press the sinh button in Scientific mode
- Ctrl + T Press the tanh button in Scientific mode
- Ctrl + Y Press the y√x button in Scientific mode
- F3 Select Degrees in Scientific mode
- F4 Select Radians in Scientific mode
- F5 Select Grads in Scientific mode
- ; Press the Int button in Scientific mode
- # Press the x^3 button in Scientific mode
- ! Press the n! button in Scientific mode
- F2 Select Dword in Programmer mode
- F3 Select Word in Programmer mode
- F4 Select Byte in Programmer mode
- F5 Select Hex in Programmer mode
- F6 Select Dec in Programmer mode
- F7 Select Oct in Programmer mode
- F8 Select Bin in Programmer mode
- F12 Select Qword in Programmer mode
- J Press the RoL button in Programmer mode
- K Press the RoR button in Programmer mode
- < Press the Lsh button in Programmer mode
- > Press the Rsh button in Programmer mode
- % Press the Mod button in Programmer mode
- | Press the Or button in Programmer mode
- ^ Press the Xor button in Programmer mode
- ~ Press the Not button in Programmer mode
- & Press the And button in Programmer mode
- Spacebar Toggles the bit value in Programmer mode
- A Press the Average button in Statistics mode
- D Press the CAD button in Statistics mode
- S Press the Sum button in Statistics mode
- T Press the S.D. button in Statistics mode
- Ctrl + A Press the Average Sq button in Statistics mode
- Ctrl + S Press the Sum Sq button in Statistics mode
- Ctrl + T Press the Inv S.D. button in Statistics mode
Command Prompt Keyboard Shortcuts
- F1 or Right Arrow Auto fills characters from previously ran command one by one in the current command prompt session
- F2 Copies characters from previously ran command in the current command prompt session
- F3 Repeats running the last command ran in the current command prompt session
- F5 or Up/Down Arrow Cycles through previously ran commands from command history in the current command prompt session
- F7 Displays list of all previously ran commands in the numerical order that they were ran in from the current command prompt session. You can use the Up or Down arrow keys to cycle though them, and press Enter to run the selected command.
- F8 Auto fills matching command name from previously ran command history in the current command prompt session when you type a charater and press F8. Continuing to press F8 will allow you to cycle through all matching names.
- F9 When pressed, this will ask you to "Enter command number". Type in the command number from the order it was ran (F7 to see number) in and press Enter to run the command.
- ALT+F7 Clears command history
- Esc Erases current line
- Tab Auto fills matching file or folder names in current directory when you type a charater and press tab. Continuing to press tab will allow you to cycle through all matching names in current directory.
Dialog Box Keyboard Shortcuts
- Arrow Keys Select a button if the active option is a group of option buttons
- Backspace Open a folder one level up if a folder is selected in the Save As or Open dialog box
- Ctrl + Shift + Tab Move back through tabs
- Ctrl + Tab Move forward through tabs
- Enter Replaces clicking the mouse for many selected commands
- F4 Display the items in the active list
- Shift + Tab Move back through options
- Spacebar Select or clear the check box if the active option is a check box
- Tab Move forward through options
Ease of Access Keyboard Shortcuts
- Left Alt + Left Shift + Num Lock Turn Mouse Keys on or off
- Left Alt + Left Shift + PrtScn Turn High Contrast on or off
- Num Lock (hold for 8 seconds) Turn Toggle Keys on or off
- Right Shift (hold for 8 seconds) Turn Filter Keys on and off
- Shift (pressed 5 times) Turn Sticky Keys on or off
- Windows Key + U Open Ease of Access Center
Function Key Keyboard Shortcuts
NOTE: On multimedia keyboards, you may need to press the F-Lock or Function key first.
- F1 Open Help window
- F2 Rename the selected item
- F3 Opens Search window
- F4 Display the Address bar drop down list in Windows Explorer and Internet Explorer
- F5 Refresh the current active window
- F6 Cycle through items in current active window
- F10 Displays the menu bar in the active window and underlines the menu bar shortcut keys
- F11 Toggle Full Screen Mode On or Off in Windows Explorer and Internet Explorer
- Alt + F4 Close the current active window or program. From the desktop, it opens the Shut Down Windows window.
- Ctrl + F4 Close the active document (in programs that allow you to have multiple documents open simultaneously)
- Shift + F10 Open context menu of selected item
General Keyboard Shortcuts
- Alt + D Move focus to address bar in Windows Explorer and Internet Explorer
- Alt + D, Tab Move focus to search bar in Windows Explorer and Internet Explorer
- Alt + Enter or Alt + Double Click on File Open Properties window of selected item
- Alt + Esc Cycle through all open windows.
- Alt + P Turn Preview Pane on or off in Windows Explorer
- Alt + Left Arrow Go back in Windows Explorer
- Alt + Right Arrow Go forward in Windows Explorer
- Alt + underlined letter Display the corresponding menu or Perform the menu command
- Alt + Up Arrow Go Up a directory in Windows Explorer
- Alt + Tab select a open items or windows to see.
- Alt + Spacebar Open menu of the current active window
- Ctrl + Alt + Tab Use the arrow keys to switch between open items or windows
- Ctrl + Down Arrow Move the cursor to the beginning of the next paragraph
- Ctrl + Up Arrow Move the cursor to the beginning of the previous paragraph
- Ctrl + Left Arrow Move the cursor to the beginning of the previous word
- Ctrl + Right Arrow Move the cursor to the beginning of the next word
- Ctrl + Shift + Arrow Select a block of text
- Ctrl + Arrow + Spacebar Select multiple individual items in a window or on the desktop
- Ctrl + A Select all items in active open window
- Ctrl + C Copy the selected item
- Ctrl + Esc Open Start menu
- Ctrl + Mouse Wheel Increase or decrease icon size in current active Windows Explorer window or desktop
- Ctrl + N Opens new Windows Explorer or Internet Explorer window
- Ctrl + Shift + N Creates a New Folder on the active desktop or in the active Windows Explorer window.
- Ctrl + Shift + Esc Open Task Manager
- Ctrl + V Paste the selected item
- Ctrl + X Cut the selected item
- Ctrl + Y Redo an action
- Ctrl + Z Undo an action
- Delete Delete the selected item and move it to the Recycle Bin
- End Scroll to the bottom of the current active window
- Esc Cancel the current task
- Home Scroll to the top of the current active window
- Right Arrow Open the next menu to the right, or open a submenu
- Left Arrow Open the next menu to the left, or close a submenu
- Shift + Arrow Select more than one item in a window or on the desktop, or select text within a document
- Shift + Delete Delete selected item permanently without it going to the Recycle Bin first.
- Shift + Left Click Select a item or multiple items
- Shift (when you insert a CD) Prevent the CD from automatically playing
Help and Support Keyboard Shortcuts
- Alt + A Display the customer support page
- Alt + C Display the Table of Contents
- Alt + N Display the Connection Settings menu
- Alt + Left Arrow Move back to the previously viewed help topic
- Alt + Right Arrow Move forward to the next previously viewed help topic
- Alt + Home Display the Help and Support home page
- Ctrl + F Search the current help topic
- Ctrl + P Print the current help topic
- End Move to the end of a help topic
- F3 Move focus to the Search box
- F10 Display the Options menu
- Home Move the to beginning of a help topic
Magnifier Keyboard Shortcuts
- Ctrl + Alt + Arrow keys Pan in the direction of the arrow keys
- Ctrl + Alt + D Switch to docked mode
- Ctrl + Alt + F Switch to full-screen mode
- Ctrl + Alt + I Invert colors
- Ctrl + Alt + L Switch to lens mode
- Ctrl + Alt + R Resize the lens
- Ctrl + Alt + Spacebar Show the mouse pointer
- Windows Key + Esc Exit Magnifier
- Windows Key + Plus Sign (+) or Minus Sign (-) Zoom in or out
Paint Keyboard Shortcuts
- Alt Display keytips
- Alt + F4 Close a picture and its Paint window
- Ctrl + A Select the entire picture
- Ctrl + B Bold selected text
- Ctrl + C Copy a selection to the Clipboard
- Ctrl + E Open the Properties dialog box
- Ctrl + G Show or hide gridlines
- Ctrl + I Italicize selected text
- Ctrl + Minus Sign (-) Decrease the width of a brush, line, or shape outline by one pixel
- Ctrl + N Create a new picture
- Ctrl + O Open an existing picture
- Ctrl + P Print a picture
- Ctrl + Page Down Zoom out
- Ctrl + Page Up Zoom in
- Ctrl + Plus Sign (+) Increase the width of a brush, line, or shape outline by one pixel
- Ctrl + R Show or hide the ruler
- Ctrl + S Save changes to a picture
- Ctrl + U Underline selected text
- Ctrl + V Paste a selection from the Clipboard
- Ctrl + W Open the Resize and Skew dialog box
- Ctrl + X Cut a selection
- Ctrl + Y Redo a change
- Ctrl + Z Undo a change
- Delete Delete a selection
- Esc Cancel a selection
- F1 Open Paint Help
- F10 Display keytips
- Shift + F10 Show the current shortcut menu
- F11 View a picture in full-screen mode
- F12 Save the picture as a new file
- Right Arrow Move the selection or active shape right by one pixel
- Left Arrow Move the selection or active shape left by one pixel
- Down Arrow Move the selection or active shape down by one pixel
- Up Arrow Move the selection or active shape up by one pixel
Remote Desktop Keyboard Shortcuts
- Alt + Delete Display the system menu.
- Alt + Home Display the Start menu.
- Alt + Insert Cycle through programs in the order that they were started in.
- Alt + Page Down Move between programs from right to left.
- Alt + Page Up Move between programs from left to right.
- Ctrl + Alt + Break Switch between a window and full screen.
- Ctrl + Alt + End Display the Windows Security dialog box.
- Ctrl + Alt + Minus Sign (-) on numeric keypad Place a copy of the active window, within the client, on the Terminal server clipboard (provides the same functionality as pressing Alt+PrtScn on a local computer).
- Ctrl + Alt + Plus Sign (+) on numeric keypad Place a copy of the entire client window area on the Terminal server clipboard (provides the same functionality as pressing PrtScn on a local computer).
- Ctrl + Alt + Right Arrow Tab out of the Remote Desktop controls to a control in the host program (for example, a button or a text box). Useful when the Remote Desktop controls are embedded in another (host) program.
- Ctrl + Alt + Left Arrow Tab out of the Remote Desktop controls to a control in the host program (for example, a button or a text box). Useful when the Remote Desktop controls are embedded in another (host) program.
Taskbar Keyboard Shortcuts
- Ctrl + Left Click Use on a grouped pinned taskbar program icon to cycle through the open windows in that group.
- Ctrl + Shift + Left Click Use on a pinned taskbar program icon to open another instance of that program with administrator privileges (run as administrator)
- Shift + Left Click Use on a pinned taskbar program icon to open another instance of that program.
- Shift + Right Click Use on a pinned taskbar program icon to open the context menu for the icon.
- Shift + Right Click Use on a grouped icon on the taskbar to open the context menu for the group.
- Windows Key + (1 to 0) Opens the pinned taskbar icon that corresponds to the order that they are in from left (1) to right (0) on the taskbar. 0 is for 10.
- Windows Key + Alt + (1 to 0) Opens the Jump List of recently accessed items for the program pinned to the taskbar in the position indicated by the number.
- Windows Key + Ctrl + (1 to 0) Switches to the last active window of the program pinned to the taskbar in the position indicated by the number
- Windows Key + Shift + (1 to 0) Starts a new instance of the program pinned to the taskbar in the position indicated by the number
- Windows Key + B Makes the focus on the system tray icons (notification area icons) on the taskbar
- Windows Key + T Cycle through programs on the taskbar. Press Enter to open the one selected.
- Windows Key + Shift + T Cycle backwards through programs on the taskbar. Press Enter to open the one selected.
Windows Explorer Keyboard Shortcuts
- Alt + D Select the address bar
- Alt + Enter or Alt + Double Click on File Opens the Properties window of the selected item
- Alt + P Toggle the preview pane on or off
- Alt+Left Arrow View the previous folder
- Alt + Right Arrow View the next folder
- Alt + Up Arrow Go up one folder level in the path
- Back Go back one folder level in the path
- Ctrl + E Select the search box
- Ctrl + Mouse scroll wheel Change the size and appearance of file and folder icons
- Ctrl + N Open a new window
- Ctrl + Shift + N Creates a New Folder on the active desktop or in the active Windows Explorer window.
- End Display the bottom of the active window
- F11 Maximize or minimize the active window
- Home Display the top of the active window
- Num Lock + Asterisk (*) on numeric keypad Display all subfolders under the selected folder
- Num Lock + Plus Sign (+) on numeric keypad Display the contents of the selected folder
- Num Lock + Minus Sign (-) on numeric keypad Collapse the selected folder
- Left Arrow Collapse the current selection (if it's expanded), or select the parent folder
- Right Arrow Display the current selection (if it's collapsed), or select the first subfolder
- Shift+Right Click on a file Adds Copy as Path, which copies the path of a file to the clipboard.
- Shift+Right-Click on a file Adds extra hidden items to the Send To context menu.
- Shift+Right-Click on a folder Adds Open Command Prompt Here to the context menu.
Windows Journal Keyboard Shortcuts
- Alt + F4 Close a note and its Journal window
- Ctrl + A Select all items on a page
- Ctrl + C Copy a selection to the Clipboard
- Ctrl + Shift + C Display a shortcut menu for column headings in a note list
- Ctrl + F Start a basic find
- Ctrl + G Go to a page
- Ctrl + N Start a new note
- Ctrl + O Open a recently used note
- Ctrl + P Print a note
- Ctrl + S Save changes to a note
- Ctrl + V Paste a selection from the Clipboard
- Ctrl + Shift + V Move a note to a specific folder
- Ctrl + X Cut a selection
- Ctrl + Y Redo a change
- Ctrl + Z Undo a change
- Esc Cancel a selection
- Delete Delete a selection
- F1 Open Journal Help
- F5 Refresh find results or Refresh the note list
- F6 Toggle between a note list and a note
- F11 View a note in full-screen mode
Windows Logo Keyboard Shortcuts
- Windows Key Open or close the Start menu
- Windows Key + Pause/Break Opens the System properties window
- Windows Key + B Moves focus to the program that displayed a message in the Notification Area on the taskbar
- Ctrl + Windows Key + B Switch focus to the program that displayed a message in the notification area
- Windows Key + D Toggles to Show Desktop and restore desktop
- Windows Key + M Minimize all opened windows
- Windows Key + Shift + M Restore minimized windows to the desktop
- Windows Key + E Open Window Explorer to Libraries
- Windows Key + F Open Search window
- Ctrl + Windows Key + F Search for computers (if you are on a network)
- Windows Key + G Displays desktop gadgets
- Windows Key + L Lock your computer or switch users
- Windows Key + P Displays desktop to projector display presentation switch window.
- Windows Key + R Open Run command window
- Windows Key + T Cycle through programs on the taskbar. Press Enter to open the one selected.
- Windows Key + Shift + T Cycle backwards through programs on the taskbar. Press Enter to open the one selected.
- Windows Key + Tab Cycle through open windows by using Flip 3D. Release to open the window in the front.
- Ctrl+Windows Key + Tab Use the tab or left and right arrow keys to cycle through open windows by using Flip 3D. Press enter or click on the first window to open the window in the front.
- Windows Key + U Open Ease of Access Center
- Windows Key + X Open Windows Mobility Center
- Windows Key + Spacebar Press and hold for a Desktop Preview. Also known as Aero Peak.
- Windows Key + 1 to 0 Opens the program pinned to the taskbar that corresponds to the order that they are in from left (1) to right (0) on the taskbar. 0 is for 10.
- Ctrl+Windows Key + 1 to 0 Switch to the last active window of the program pinned to the taskbar that corresponds to the order that they are in from left (1) to right (0) on the taskbar. 0 is for 10.
- Shift + Windows Key + 1 to 0 Start a new instance of the program pinned to the taskbar that corresponds to the order that they are in from left (1) to right (0) on the taskbar. 0 is for 10. If the program is already running, switch to that program.
- Windows Key + Left Arrow Docks and undocks current active window to the left side of the screen.
- Windows Key + Shift+ Left Arrow Moves the current active window over one monitor to the left.
- Windows Key + Right Arrow Docks and undocks current active window to the right side of the screen.
- Windows Key, Right Arrow, Enter Shutdown
- Windows Key, Right Arrow, Right Arrow, R Restart
- Windows Key, Right Arrow, Right Arrow, S Sleep
- Windows Key, Right Arrow, Right Arrow, W Switch Users
- Windows Key + Shift+ Right Arrow Moves the current active window over one monitor to the right.
- Windows Key + Up Arrow Maximizes current active window to full screen.
- Windows Key + Shift + Up Arrow Maximizes current active window vertically.
- Windows Key + Shift + Down Arrow Restores vertically maximized current active window back to the way it was before maximized vertically.
- Windows Key + Down Arrow Minimizes current active window to taskbar.
- Windows Key + Home Toggles minimize and restore not active open windows.
- Windows Key + + Zoom in
- Windows Key + - Zoom out
- Windows Key + = Open Magnifier
Windows Media Center Basic Navigation Keyboard Shortcuts
- Alt + Enter Go in or out of full-screen mode
- Arrow keys Move left, right, up, or down
- Backspace Go back to previous screen
- End Go to the last item in list
- Enter Accept a selection
- Home Go to the first item in list
- Windows Key + Alt + Enter Open Media Center or Return to Media Center start screen
Windows Media Center Audio Keyboard Shortcuts
- Ctrl + B Go to the beginning of the current song
- Ctrl + D Display the shortcut menu
- Ctrl + F Skip to the next song
- Ctrl + M Go to the Music library page
- Ctrl + P Pause a song
- Ctrl + R Rip a CD
- Ctrl + Shift + F Fast forward a song
- Ctrl + Shift + P Play a song
- Ctrl + Shift + S Stop playing a song
- F8 Mute or unmute volume
- F9 Turn down volume
- F10 Turn up volume
Windows Media Center View Pictures Keyboard Shortcuts
- Ctrl + D Display the shortcut menu
- Ctrl + I Go to pictures
- Ctrl + P Pause or resume a slide show
- Ctrl + Shift + P Play a slide show
- Ctrl + Shift + S Stop a slide show
- Enter Zoom in on a picture
- Up Arrow or Left Arrow Skip back to the previous picture
- Down Arrow or Right Arrow Skip forward to the next picture
Windows Media Center Watch & Record TV Keyboard Shortcuts
- Ctrl + B Skip back
- Ctrl + D Display the shortcut menu
- Ctrl + F Skip forward
- Ctrl + G Go to the Guide
- Ctrl + O Go to Recorded TV
- Ctrl + P Pause or resume live TV or recorded TV
- Ctrl + R Record a TV Show
- Ctrl + Shift + B Rewind live TV or recorded TV
- Ctrl + Shift + F Fast forward live TV or recorded TV
- Ctrl + Shift + P Resume playing a TV show
- Ctrl + Shift + S Stop recording or stop playing a TV show
- Ctrl + Shift + Z Change the screen aspect ratio (zoom)
- Ctrl + T Go to live TV
- Page Up - Go to the next channel
- Page Down - Go to the previous channel
Windows Media Center Play DVDs Keyboard Shortcuts
- Ctrl + B Go to previous chapter
- Ctrl + F Go to next chapter
- Ctrl + P Pause or resume a DVD
- Ctrl + Shift + A Change the DVD audio selection
- Ctrl + Shift + B Rewind a DVD
- Ctrl + Shift + F Fast forward a DVD
- Ctrl + Shift + M Go to the DVD menu
- Ctrl + Shift + P Play a DVD
- Ctrl + Shift + S Stop a DVD
- Ctrl + Shift + Z Change the screen aspect ratio (zoom)
Windows Media Center Play Videos Keyboard Shortcuts
- Ctrl + B Skip back
- Ctrl + E Go to Videos
- Ctrl + F Skip forward
- Ctrl + P Pause or resume a video
- Ctrl + Shift + B Rewind a video
- Ctrl + Shift + F Fast forward a video
- Ctrl + Shift + P Play a video
- Ctrl + Shift + S Stop a video
- Ctrl + Shift + Z Change the screen aspect ratio (zoom)
Windows Media Player Keyboard Shortcuts
- Alt + 1 Video Size 50% in Now Playing or skin mode, with a video playing
- Alt + 2 Video Size 100% in Now Playing or skin mode, with a video playing
- Alt + 3 Video Size 200% in Now Playing or skin mode, with a video playing
- Alt + Enter Full Screen Toggle in Now Playing, skin, or full screen mode
- Ctrl + 1 Switches to library mode from any mode
- Ctrl + 2 Switches to skin mode from any mode
- Ctrl + 3 Switches to player mode from any mode except full screen
- Ctrl + 7 Add to Play in library mode
- Ctrl + 8 Add to Burn in library mode
- Ctrl + 9 Add to Sync in library mode
- Ctrl + A Selects everything in a list in the library or list
- Ctrl + B Previous (Item or Chapter) with content playing
- Ctrl + E Focus on Search text box and switch to library mode if not there
- Ctrl + F Next (Item or Chapter) with content playing
- Ctrl + H Turn on/off shuffle mode
- Ctrl + J Eject in any mode
- Ctrl + M Toggle menu bar in library in any mode
- Ctrl + N Create playlist in library mode
- Ctrl + O Shows Open Dialog in any mode
- Ctrl + P Play/Pause Toggle with content queued up
- Ctrl + Q Adds selected track to open list. Default is Play list.
- Ctrl + S Stops Playback with content playing
- Ctrl + T Turn on/off repeat mode in any mode
- Ctrl + U Shows Open URL Dialog in any mode
- Ctrl + W Stops playback with content playing or paused
- Ctrl + Shift + B Rewinds playing content with DVD playing
- Ctrl + Shift + C Caption On/Off Toggle when playing content which has captions
- Ctrl + Shift + F Fast forwards playing content with content playing
- Ctrl + Shift + G Play Speed Fast with content playing
- Ctrl + Shift + N Play Speed Normal with content playing
- Ctrl + Shift + S Play Speed Slow with content playing
- Ctrl + Right Arrow Next playlist in playlist history when focus is not on Seek bar
- Ctrl + Left Arrow Previous playlist in playlist history when focus is not on Seek bar
- Ctrl + Right Arrow Skip forward (large increment) when focus is on Seek bar
- Ctrl + Left Arrow Skip backward (large increment) when focus is on Seek bar
- Shift + Right Arrow Skip forward (small increment) when focus is on Seek bar
- Shift + Left Arrow Skip backward (small increment) when focus is on Seek bar
- Right Arrow Skip forward when focus is on Seek bar
- Left Arrow Skip backward when focus is on Seek bar
- Ctrl + Click Resize player to image in Now Playing mode
- Escape Return to Now Playing in Full Screen Mode
- F1 Opens Help file in any mode
- F2 Edit meta data column in library mode with an item selected
- F4 Switch view mode in library mode, focus in list view
- F5 Refresh screen when focus is on library or in online services
- F6 Increases album art when focus is in list view
- Shift + F6 Decreases album art when focus is in list view
- F7 Mutes sound in any mode
- F8 Decrease sound volume in any mode
- F9 Increases sound volume in any mode
- F10 Show menu bar in library from any mode
- Shift + F10 Context menu shortcut in any mode
WordPad Keyboard Shortcuts
- Alt + F4 Close WordPad
- Ctrl + 1 Set single line spacing
- Ctrl + 2 Set double line spacing
- Ctrl + 5 Set line spacing to 1.5
- Ctrl + A Select the entire document
- Ctrl + Shift + A Change characters to all capitals
- Ctrl + B Make selected text bold
- Ctrl + C Copy a selection to the Clipboard
- Ctrl + D Insert a Microsoft Paint drawing
- Ctrl + Delete Delete the next word
- Ctrl + E Align text center
- Ctrl + End Move to the end of the document
- Ctrl + F Find text in a document
- Ctrl + H Replace text in a document
- Ctrl + Home Move to the beginning of the document
- Ctrl + I Italicize selected text
- Ctrl + J Justify text
- Ctrl + L Align text left
- Ctrl + Shift + L Change the bullet style
- Ctrl + N Create a new document
- Ctrl + O Open an existing document
- Ctrl + P Print a document
- Ctrl + Page Down Move down one page
- Ctrl + Page Up Move up one page
- Ctrl + R Align text right
- Ctrl + S Save changes to a document
- Ctrl + U Underline selected text
- Ctrl + V Paste a selection from the Clipboard
- Ctrl + X Cut a selection
- Ctrl + Y Redo a change
- Ctrl + Z Undo a change
- Ctrl + = Make selected text subscript
- Ctrl + Shift + = Make selected text superscript
- Ctrl + Shift + > Increase the font size
- Ctrl + Shift + < Decrease the font size
- Ctrl + Left Arrow Move the cursor one word to the left
- Ctrl + Right Arrow Move the cursor one word to the right
- Ctrl + Up Arrow Move the cursor to the line above
- Ctrl + Down Arrow Move the cursor to the line below
- F1 Open WordPad Help
- F3 Find the next instance of the text in the Find dialog box
- F10 Display keytips
- Shift + F10 Show the current shortcut menu
- F12 Save the document as a new file
Subscribe to:
Comments (Atom)